Ediza Lake & Iceberg Lake Trail Guide (A Sierra Nevada Alpine Adventure)

The Sierra Nevada are such a special place, and hiking to Ediza Lake is the perfect way to get a taste of the alpine with stunning mountain peaks and gorgeous lakes. The Ediza Lake hike makes for an epic adventure day, especially if you add on just a bit more mileage to check out Iceberg Lake, too. You can also make this into a lovely backpacking trip and spend some time under the stars in the Sierras.
WHAT WE WILL COVER IN THIS GUIDE TO EDIZA LAKE
If you’re intrigued about hiking to Ediza Lake, this guide will go over everything you need to know to hit the trail to explore some awesome alpine lakes.

In this post, we will cover the following topics to help you plan for your very own Ediza Lake hike:
Ediza Lake Trail Stats - All the nitty gritty details for the trail in one spot. How many miles, elevation gain, & more.
Day Hiking vs Backpacking Ediza Lake – Explore which option is best for you!
When to Hike Ediza Lake – The best time to hike Ediza Lake and typical weather to expect on your trip.
Ediza Lake Hike Map & GPX Files - I've created a map detailing the entire Ediza Lake trail that you can explore, including a look at the elevation gain/profile of the hike. You can also download this file as a GPX file to upload into your own personal GPS device.
How to Get to the Ediza Lake Trailhead – Driving, parking, and shuttle info.
Itinerary for Hiking the Ediza Lake Trail - I’ll walk you through a suggested itinerary for hiking the Ediza Lake trail so you can make your plans accordingly.
Important Ediza Lake Safety Tips – Tips about the top hazards to expect along the Ediza Lake trail.
What to Bring on Your Ediza Lake Hike – The essential packing list for your Ediza Lake hike – don’t hit the trail without these things!
If you’re looking for specific information, feel free to skip ahead to the section you’re looking for!
Plus, be sure to check out the bottom of this post to find more hiking trail guides in the Sierras and California and other additional hiking, camping, and backpacking resources!
GRAB MY [FREE] OUTDOOR BACKPACKER STARTER KIT
I created the Ultimate Outdoor Backpacker Starter Kit for you (and it's FREE)! This starter kit is filled with 14 pages of my best hiking and backpacking tips to help you learn what it takes to become a safe, confident, and self-sufficient outdoor backpacker!
1) EDIZA LAKE TRAIL STATS
If you’re anything like me, the first thing you want to know about a trail is the important stats and information, so you can get an overview about what the hike is all about. So here’s what you need to know about the Ediza Lake hike!
EDIZA LAKE TRAIL QUICK FACTS
Type of Trail: Out & Back
How long is the hike to Ediza Lake: 13 miles (15 miles if you go to Iceberg Lake)
Total Elevation Gain: 1,700 feet (or around 2,200 if you go to Iceberg Lake)
Trailhead: Agnew Meadows
How long does it take to hike Ediza Lake? It takes approximately 8 hours to do this as a day hike, maybe a little more if you want to spend some time at the lakes.
Ediza Lake crowds: This is a popular area, so you’ll probably see plenty of other hikers on the trail.
Do you need a permit to hike Ediza Lake? Permits are not required for day hiking this trail, but you will need one if you are backpacking & camping overnight.
How difficult is hiking Ediza Lake? Strenuous. The elevation gain isn’t too bad and it’s fairly gradual (until the last bit to Iceberg Lake), but this is a long day hike.
Is there drinking water available along the Ediza Lake hike? Yes, there are creeks and lakes you can filter water from.
Is hiking Ediza Lake dog-friendly? Yes! Your furry friend can join you on this trail as long as they’re on a leash.
2) DAY HIKING VS BACKPACKING EDIZA LAKE
I like Ediza Lake & Iceberg Lake for a long day hike, but you can also do this trail as a backpacking trip. Here, we’ll go over the pros and cons of each option.
DAY HIKING EDIZA LAKE
It’s a long hike to Ediza Lake if you do it in a day – especially if you go all the way to Iceberg Lake – but it’s totally doable. I think it’s a perfect alpine adventure day hike! Plus, you don’t have to worry about getting a wilderness permit if you day hike.

BACKPACKING EDIZA LAKE
Backpacking to Ediza Lake lets you slow your pace and savor your time in the Sierra backcountry. You could also set up camp at Ediza Lake and then do the hike up to Iceberg Lake with a lighter pack. And if you’re a beginner backpacker, this would be a great one-night intro backpacking trip.
But you will have to plan ahead in order to backpack, since an Inyo Wilderness permit is required in order to camp overnight here. Also, camping by a lake means you might have to deal with some serious mosquitoes, especially during the summer season, so be prepared!
3) WHEN TO HIKE EDIZA LAKE
I typically think September is the ideal time to hike in the Sierra Nevadas. The temperature is usually perfect, plus there are far fewer mosquitos than in the summer. July and August are also good options, though it tends to be hotter, and trust me, you’ll definitely want to bring your bug spray.
However, these days, wildfires are now a concern that you need to factor in during summer and fall. Earlier or later in the season (June or October), you have a good chance of encountering snow in the Sierra, which makes the trails more of a challenge and potentially dangerous.
Check out the Ediza Lake weather average temperature graph below for reference.

Be prepared before you go. Just like I teach my students in my backpacking program, it’s important that you research your weather conditions before you go, in the weeks and days before your trip. You can check the weather conditions here:
Mountain Forecast – One of my favorite resources for mountain weather forecasts when checking a few days before a trip
PSST.. ARE YOU READY TO FINALLY UNDERGO YOUR OWN BACKPACKING TRANSFORMATION?
Join me (and your peers) on a transformational adventure, where you will learn how to confidently go on your first ever (or perhaps your first solo) outdoor backpacking trip without the constant fear of getting lost, the debilitating worry of being unprepared, and the lurking feeling that you lack the "know-how" and skills required to stay safe on the trails. Click below to be the first to know when my one-of-a-kind backpacking program re-opens again for enrollment!
Join the Backpacking Badass Program Waitlist
4) EDIZA LAKE HIKE MAP & GPX FILES
The Ediza Lake trail is fairly easy to follow, but there are some trail junctions to be aware of. It’s always a good idea to take a GPS map to navigate so you don’t get off course.
I’ve created a map detailing the whole Ediza Lake trail that you can explore here, including a look at the elevation gain/profile of the hike. You can also download this file as a GPX file to upload into your own personal GPS device.

I always recommend downloading a GPX file onto a GPS device, that way you can check in from time to time to be sure you’re on the right trail.
You can download the GPX files from the Ediza Lake trail map below. It details all the key milestones of the hike including the trailhead start, summit, and more.
DOWNLOAD THE EDIZA LAKE GPX FILES FOR YOUR GPS HERE:
Knowledge is power my friend, and I'm a girl who loves data. Get access to this trails GPX file PLUS my library of GPX files with tracks and waypoints for all the trails loaded onto the She Dreams of Alpine blog.
Load this puppy into your trusted GPS and rest easy knowing you have tracks to follow on your next hike or backpacking trip.
DON’T HAVE A GPS? YOU SHOULD.
I believe every hiker and backpacker should strive to be self-sufficient, and that includes knowing how to practice smart navigational skills in the outdoors.
This is an important safety skill set that I teach in-depth inside of my backpacking program. There’s no reason to risk getting lost in the outdoors.
Here’s what I recommend to get started:
(Note: This list contains affiliate links)
Gaia is offering a special 10% discount on a premium account to those who subscribe online through my link.
Don’t know where to start? If you need help with some Gaia GPS basics, download my quick Gaia GPS navigation 101 guide.
2) Get an SOS Device: Once you are able to, I recommend investing in some sort of SOS communication device like the Garmin inReach Mini or the Garmin inReach Explorer+ . These devices provide not only GPS tracking capabilities, but also an SOS satellite search and rescue communicator and text communication abilities in the backcountry.
My Go-To Trail Setup: The Gaia GPS app (premium subscription) + the Garmin inReach Mini.
Alternative to Garmin: Pair your Gaia GPS App with the Zoleo SOS device . With this set up, the Gaia GPS App serves as your GPS navigation device, and the Zoleo serves as an SOS/communication device.
Learn more about the best GPS devices for hiking here.
EDIZA LAKE HIKE ELEVATION PROFILE
Here’s a look at the Ediza Lake hike elevation gain profile from the Agnew Meadows trailhead to Ediza Lake and back. (This does not include Iceberg Lake, if you choose to add that on.)

5) HOW TO GET TO THE EDIZA LAKE TRAILHEAD
The trailhead for the hike to Ediza Lake is at Agnew Meadows. It’s a very popular trailhead, so it can be a bit of a hassle to get there, and I would recommend an early start.
Note: A large reconstruction project is underway on Reds Meadow Road that will last through the 2025 hiking season, and this will affect access to the Agnew Meadows trailhead. Find out more details about the Reds Meadow Road Reconstruction Project at the US Forest Service site here.

PARKING
You are only allowed to drive your own vehicle to the trailhead if you arrive before 7am (or after 7pm). If you’re starting later in the day, you will need to use the shuttle service instead.
SHUTTLE
Most people hiking to Ediza Lake will have to take the Reds Meadow Shuttle to access the trailhead. The shuttle generally runs from early June to early September, and a shuttle ticket is $15 for a 5-hour pass.
You board the shuttle at Mammoth Mountain Adventure Center, where you can find free parking in the lots near the Mammoth Lodge. You’ll get off the shuttle at Stop #1, Agnew Meadows, to hike Ediza Lake.
6) ITINERARY FOR HIKING THE EDIZA LAKE TRAIL
Here, I’ll walk you through a basic itinerary for day hiking to Ediza and Iceberg Lake, so you can start making a plan for your own hike.
A TYPICAL EDIZA LAKE HIKING ITINERARY
I recommend a long day hike to Ediza and Iceberg Lake. It’s an epic all-day adventure in the Sierras, but in the summer or early fall, you should have plenty of daylight to enjoy this trail.
Note: If you’re coming to the Sierras from sea level, I would suggest that you stay in Mammoth Lakes for a night before this hike to get acclimated to the altitude.
You’ll want to start your day early, and I recommend getting energized with strong coffee and yummy breakfast burritos at Stellar Brew in Mammoth. Then drive to the trailhead if it’s before 7am, or make your way to the shuttle at Mammoth Mountain Adventure Center.
Once you’re at the Agnew Meadows trailhead, you’ll start your hike up the River Trail, head past a few junctions, and eventually take a left up the Shadow Creek Trail toward Shadow Lake.

Shadow Lake is the first alpine lake you’ll come to on this hike, around 4 miles in. Enjoy your hike along the lake before you continue on the Shadow Creek Trail all the way up to Ediza Lake.
When you arrive at Ediza Lake, prepare for your jaw to drop at the stunning views of this alpine lake surrounded by granite peaks. You can spend some simply soaking in the beauty before either turning around or heading on to Iceberg Lake - which I highly recommend!
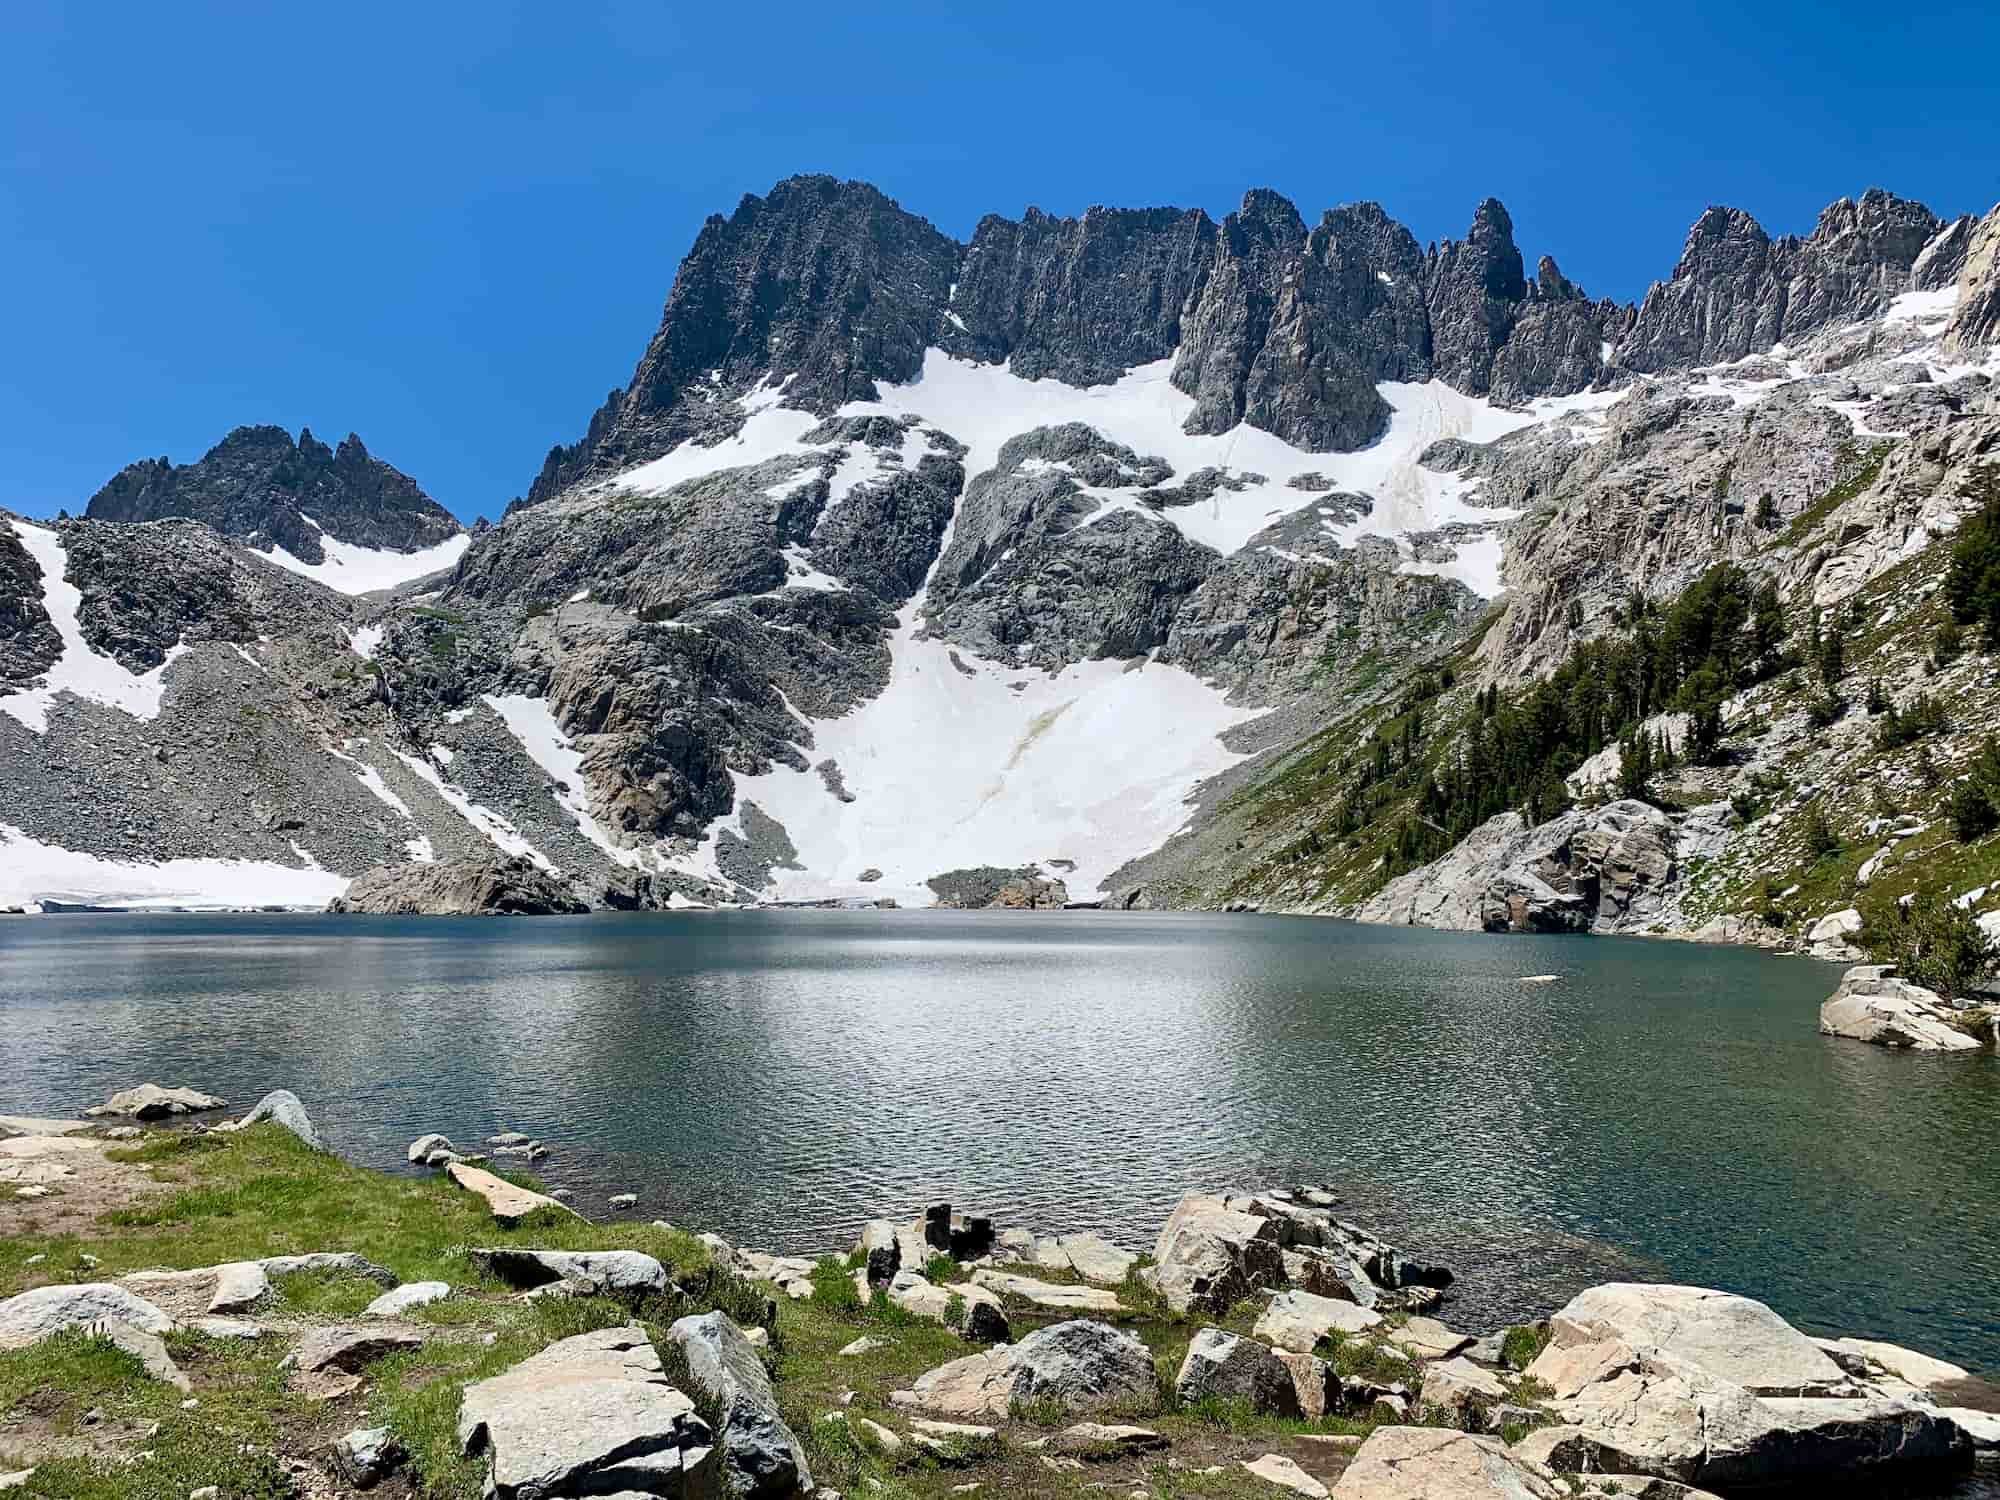
Iceberg Lake is equally gorgeous and absolutely worth the little bit of extra hiking (and elevation gain to get there). Make sure to give yourself plenty of time to appreciate this incredible landscape of the Sierra Nevada before you make your way back the way you came to the trailhead.
7) IMPORTANT EDIZA LAKE SAFETY TIPS
While the hike to Ediza Lake is not technical, you should be aware of the following potential safety hazards and prepare accordingly to minimize risk.

ALTITUDE
While Ediza Lake and Iceberg Lake are not actually at that high of elevation compared to other places in the Sierra Nevada, the trailhead starts at around 8,300 feet elevation, and you’ll end up all the way up at nearly 9,800 feet if you go to Iceberg Lake. Although this elevation usually doesn’t cause severe altitude sickness, it could make the hike feel like a serious struggle if you’re coming from sea level. In that case, it’s probably worth spending a night in Mammoth Lakes before the hike in order to give your body a little time to adjust.
SNOW
If you hike Ediza Lake early (or late) in the season, you might encounter snow on the trail, which makes the hike more technical and potentially treacherous. In the middle of the summer, the trail should be clear and melted out, but early in the summer or later in the fall, you should definitely check the updated trail conditions and snowfall totals for the season before you attempt this hike.
MOSQUITOES
While the summer months of July and August typically offer dry trail conditions, they also are the months when you will find the most mosquitoes. In this area – especially around lakes – mosquitoes can be a huge nuisance and make your hike pretty miserable.
Be sure to bring plenty of bug spray and maybe even insect-repellent clothing if you’re hiking in the height of summer. Also, if you’re backpacking, set up your camp farther away from water, where wind will help keep some of the mosquitoes away.

WILDLIFE
This area of the Eastern Sierras is filled with lots of different wildlife, but the biggest concern is black bears. Usually, black bears are scared and skittish around humans, but the bears here might be a little more bold since they are more accustomed to seeing people around.
When in the Sierras, you should practice standard bear safety principles including (but not limited to) the following:
Make noise while you hike so wildlife is never startled by your presence.
Always keep your distance if you see a bear.
Never run from a bear.
Stand your ground and make yourself look big if you encounter a bear.
Always store your food (and any other scented items) at night in either a bear box or bear canister.
In this area, rangers ask that you don’t bring bear spray with you. Just be smart, make noise (like talking to your hiking partners or shouting “hey bear!”) while you hike, and you’ll likely avoid a bear encounter.
8) WHAT TO BRING ON YOUR EDIZA LAKE HIKE
To prepare and pack for day hiking Ediza Lake, I’d recommend you head over to my hiking gear checklist and make sure you have everything you need for your trip.
Below are a few absolutely essential items you should have when you’re heading out on your Ediza Lake adventure.
*Please note that some of the below links and in this post are affiliate links.
Again, this is not all the gear you need, so be sure to check out my hiking gear checklist for my entire list of gear recommendations!.
DOWNLOAD OUR HIKING PACKING CHECKLIST
So that you can hit the trails with peace of mind knowing that you didn’t leave anything essential behind!
Now you’re ready to hit the trail and enjoy your adventure to Ediza Lake! If you’ve done this hike before, share your experience in the comments!
LOOKING FOR MORE CALIFORNIA ADVENTURES?
If you are looking for additional California hiking adventures, check out our resources below:
ESSENTIAL HIKING (OR BACKPACKING) RESOURCES
Also be sure to check out these essential hiking resources!
Cheers,
Allison - She Dreams of Alpine


The Ultimate Guide to Idaho’s Alice Lake Hike & Backpacking the Alice Toxaway Loop in the Sawtooth Mountains | If you’re looking for a show-stopping hike or backpacking trip in Idaho’s Sawtooth Mountains, then look no further. The Alice Lake Hike and Alice-Toxaway Loop are some of the most beautiful trails I’ve ever hiked on and are a must-do for any visit to Idaho. | shedreamsofalpine.com